

I don’t know about you, but I don’t like to wait one to two days for sourdough bread. That’s why I came up with this quick and easy 4-hour fresh milled sourdough artisan bread recipe. I can start this loaf in the afternoon and enjoy it with some butter by dinner time. This bread is crusty on the outside, yet soft and chewy on the inside with nutty notes from the whole grains and a subtle hint of honey sweetness.
Does 4-hour fresh milled sourdough artisan bread still have the same sourdough benefits even though it’s quick?
Yes! The reason this bread rises so quickly is due to the high amount of active starter being used. Your typical sourdough artisan bread calls for 20% starter in relation to the flour amount. So that means for a 500g of flour recipe you’d typically use 100g of starter because 100g is 20% of 500g of flour.
With that being said, this recipe calls for 100% starter as it relates to the flour amount. This allows the bread to rise quickly due to the fact that a large quantity of the dough is pre-fermented.
Can you make this sourdough artisan bread the day before and bake the next day?
The short answer is, not without changing the recipe. If you’d like to make this as a traditional next day sourdough loaf and bake it the next day, please see notes below.
Do I need a mixer for this recipe?
No. Instead of using a mixer, you can mix the water, honey, starter and flour by hand, allow to rest for 20 minutes and then add in the salt. Then do 3 sets of stretch and folds 15 minutes apart in place of the mixer kneading step. I like to use a mixer because it allows the process to be easier and quicker.
Can I add inclusions?
Yes. If you would like to add inclusions, you certainly can. I would keep the weight of the inclusions under 90g. To add the inclusions, wait until the dough is done kneading. Add the inclusions into the mixer and mix on the lowest speed for 1 minute. Please read below about different kinds of inclusions.
Not all inclusions are created equal!
Fresh garlic will kill the natural wild yeast in the sourdough starter and stop your loaf from rising. If using garlic, use roasted garlic.
Cinnamon also has natural microbial properties and will inhibit rising. Cinnamon should be added during the shaping step.
Brown sugar If making a cinnamon raisin loaf with added brown sugar, the sugar can replace the honey in the recipe. Adding sugar in after the dough is formed will make the dough wet because sugar is a natural humectant and draws in moisture.
Raisins If using raisins, soak them in hot water for at least 20 minutes before adding them. Be sure to pat them dry before adding them in. Dry raisins will draw out water from the dough causing a dryer loaf.
Jalapeño I love a good jalapeño and cheddar loaf. If using pickled jalapeños, try to pat dry before adding and do consider that the loaf can ferment a little faster with jalapeños.
Inclusions with high moisture content any inclusions with high moisture content like fruits or pickled veggies, pat dry as much as possible. Also, if needed, reduce the water in the recipe by up to 15g to compensate for any added moisture that may come from the inclusion.
Fermentation is key!
The key to lovely sourdough artisan bread is nailing the fermentation (proofing/rising) process. Don’t watch the clock, watch the dough! Any times given in this post are relative to the temperature in my home and the activeness of my sourdough starter. Your loaf could rise faster or slower. But watch the dough! When your loaf is done rising, it should still have a dome shape to the top and if you have it in a clear container, you will be able to see small air holes towards the bottom half of the dough. A flat top usually indicates that the loaf has over-proofed. If the dough is very sticky and won’t hold its shape while shaping, it has likely over-proofed. Watch the dough carefully because this loaf of sourdough does rise quickly compared to a traditional next day loaf of sourdough.
Before you get started, here are some tools you will need
Banneton or bowl
Mixer (optional) Use code LOVELYBELLBAKES20 for $20 off!
Grain mill Use code LOVELYBELLBAKES20 for $20 off!
Wheat berries Use code LOVELYBELLBAKES for 10% off a purchase of $75 or more!
Blade for scoring or knife
*As an affiliate, I earn from qualifying purchases. This means that when you click on an affiliate link on this site and make a purchase, I may earn a small commission, which helps support the work of this blog. Rest assured, I only recommend products that I genuinely love and use myself. Thank you for supporting Lovely Bell Bakes!
Let’s talk about the ingredients for this easy 4-hour fresh milled sourdough artisan bread
Fresh milled flour I chose to use hard red wheat berries because of their high protein content which lends to great gluten development. You can also use hard white wheat as well.
Active sourdough starter I like to make this with freshly fed active starter. This makes it rise more quickly. You won’t get the same result from starter that’s been in the fridge for weeks. You can make the starter up to 2 days in advance and keep it in the fridge until you’re ready to use it. My starter is 100% hydration which means that it is fed with equal grams of flour and water. To prepare for this recipe, the night before, I fed about 30g of starter with 200g of fresh milled hard red wheat and 200g of room temperature water. This way I’d have 300g for the recipe as well as some leftover.
Water I use room temperature filtered water.
Salt Use a sea salt or Redmonds real salt
Honey This is optional. I like adding honey for the flavor. Honey does take away some of the crunchiness from the crust. If you want a crisp crust on your bread, leave the honey out.
How to make this easy 4-hour fresh milled sourdough artisan bread
Mill and mix
Start by milling your grain. While that is milling, pour the water, honey and sourdough starter into your mixer bowl. Then add in the fresh milled flour, purposely leaving out the salt.
Using your mixer, mix until all of the flour is fully incorporated and there are no more dry spots. Let this sit covered with a lid or damp cloth for 20 minutes.
After 20 minutes, add in the salt right on top of the dough and knead until you’re able to get a good windowpane with the dough. This means that when you take a piece of dough and pinch and stretch it with your fingers, you’re able to see some light through it like a window. Kneading can take 8-20 minutes but do be mindful not to over knead the dough which can lead to the dough becoming too warm and overproofing.
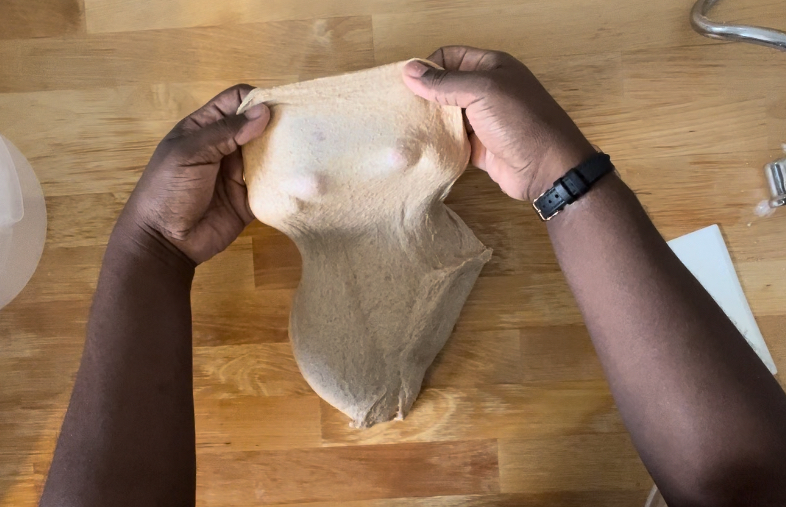
Here is what a windowpane looks like.
Rise/Proof
When you’re done kneading, place the dough into a straight edged lightly oiled container. With a dry erase marker or tape, mark how high the dough is. This will allow us to easily see how much the dough rises. This is important so we do not overproof our dough.
After 30 minutes, do one set of coil folds on the dough. Please see video for reference on how to do a coil fold. Repeat this step in another 30 minutes.
After the second set of coil folds, allow the dough to rise until it is almost doubled in size. For me this took 30 minutes after the last coil fold. Rising times can vary based on the temperature in your home and how active your starter is so take this time with a grain of salt.


Pre-shape and bench rest
Once your dough has almost doubled in size, it is time to pre-shape your dough. Gently remove your dough from the container by flipping it over and allowing it to slowly slide out of the container. We don’t want to deflate the dough like we would when making sandwich bread. Using a bench scraper or lightly oiled hands, gently shape the dough into a ball by gliding it against the counter. Please see video for reference.
After pre-shaping, allow the dough to rest on the counter uncovered for 10-15 minutes. We want to leave it uncovered for it to form a light crust on top which helps it to not stick to the counter for the final shaping. The purpose of this rest is to give the gluten time to relax in order to be able to do the final shaping.
Shape
After 10-15 minutes, lightly flour your work surface and your banneton. Using your bench scraper or your hands, flip the dough over so that the smooth top side is now down on the counter. Very lightly pull the edges of the dough to form a rectangle. Take the short edges and fold them into the center and then roll up the dough like a log. Place your log of dough in your floured banneton with the seam side up. Pinch the seam closed. See video for reference on how to shape.
Allow your dough to rest in the banneton covered for 30-45 minutes while your oven preheats to 475 degrees. If using a Dutch oven, preheat this with your oven. If using an enamel roster, there is no need to preheat. Alternatively, after putting the dough in the banneton, you can put it in the fridge for up to about 2 hours before baking. You can bake cold from the fridge.
Bake
After the dough is done resting, flip the dough onto a piece of parchment paper or silicone baking mat with the seam side down. Score the top of the dough by taking your blade or knife and slashing it from one end of the dough down to the other end. Have your blade at a 45 degree angle and press about 1/4th of an inch into the dough when making your slash. Now, using the edges of the parchment paper or silicone baking mat, lift the dough into your hot Dutch oven or enamel roaster. Place the lid on the pot. See video below for reference.
Bake at 475 degrees for 20 minutes covered. Then remove the lid and bake for an additional 20 minutes at 450 degrees uncovered. The internal temperature should be between 200-210 degrees when done.
When your bread is done baking immediately and carefully remove it from the pan by lifting it out by the parchment paper or baking mat and transferring it to a cooling rack. Allow the loaf to cool completely, about 2 hours, before enjoying. Enjoy your easy 4-hour fresh milled sourdough artisan bread with butter, alongside a soup, or as a delicious sandwich. The possibilities are endless!
You will also enjoy
Super Soft Fresh Milled Sourdough Sandwich Bread
Same-Day Fresh Milled Sourdough

Easy 4-Hour Fresh Milled Sourdough Artisan Bread
Equipment
- 1 Mixer optional
Ingredients
1 4-Hour Loaf
- 300 g Fresh milled hard white flour or hard red wheat
- 228 g Water
- 9 g Salt
- 300 g Active sourdough starter
- 30 g Honey Optional
1 Next Day Loaf *See note
- 425 g Fresh Milled hard red or hard white flour
- 350 g Water
- 9 g Salt
- 85 g Active sourdough starter
- 43 g Honey optional
Instructions
Mill and mix
- Start by milling your grain. While that is milling, pour the water, honey and sourdough starter into your mixer bowl. Then add in the fresh milled flour, purposely leaving out the salt.
- Using your mixer, mix until all of the flour is fully incorporated and there are no more dry spots. Let this sit covered with a lid or damp cloth for 20 minutes.
- After 20 minutes, add in the salt right on top of the dough and knead until you’re able to get a good windowpane with the dough. This means that when you take a piece of dough and pinch and stretch it with your fingers, you’re able to see some light through it like a window. Kneading can take 8-20 minutes but do be mindful not to over knead the dough which can lead to the dough becoming too warm and overproofing.
Rise/Proof
- When you’re done kneading, place the dough into a straight edged lightly oiled container. With a dry erase marker or tape, mark how high the dough is. This will allow us to easily see how much the dough rises. This is important so we do not overproof our dough.
- After 30 minutes, do one set of coil folds on the dough. Please see video for reference on how to do a coil fold. Repeat this step in another 30 minutes.
- After the second set of coil folds, allow the dough to rise until it is almost doubled in size. For me this took 30 minutes after the last coil fold. Rising times can vary based on the temperature in your home and how active your starter is so take this time with a grain of salt.
Pre-shape and bench rest
- Once your dough has almost doubled in size, it is time to pre-shape your dough. Gently remove your dough from the container by flipping it over and allowing it to slowly slide out of the container. We don’t want to deflate the dough like we would when making sandwich bread. Using a bench scraper or lightly oiled hands, gently shape the dough into a ball by gliding it against the counter. Please see video for reference.
- After pre-shaping, allow the dough to rest on the counter uncovered for 10-15 minutes. We want to leave it uncovered for it to form a light crust on top which helps it to not stick to the counter for the final shaping. The purpose of this rest is to give the gluten time to relax in order to be able to do the final shaping.
Shape
- After 10-15 minutes, lightly flour your work surface and your banneton. Using your bench scraper or your hands, flip the dough over so that the smooth top side is now down on the counter. Very lightly pull the edges of the dough to form a rectangle. Take the short edges and fold them into the center and then roll up the dough like a log. Place your log of dough in your floured banneton with the seam side up. Pinch the seam closed. See video for reference on how to shape.
- Allow your dough to rest in the banneton covered for 30-45 minutes while your oven preheats to 475 degrees. If using a Dutch oven, preheat this with your oven. If using an enamel roster, there is no need to preheat. Alternatively, after putting the dough in the banneton, you can put it in the fridge for up to about 2 hours before baking. You can bake cold from the fridge.
Bake
- After the dough is done resting, flip the dough onto a piece of parchment paper or silicone baking mat with the seam side down. Score the top of the dough by taking your blade or knife and slashing it from one end of the dough down to the other end. Have your blade at a 45 degree angle and press about 1/4th of an inch into the dough when making your slash. Now, using the edges of the parchment paper or silicone baking mat, lift the dough into your hot Dutch oven or enamel roaster. Place the lid on the pot. See video below for reference.
- Bake at 475 degrees for 20 minutes covered. Then remove the lid and bake for an additional 20 minutes at 450 degrees uncovered. The internal temperature should be between 200-210 degrees when done.
- When your bread is done baking immediately and carefully remove it from the pan by lifting it out by the parchment paper or baking mat and transferring it to a cooling rack. Allow the loaf to cool completely, about 2 hours, before enjoying.


I’ve made this the last two days. My family has devoured it! If I want to scale it up to two boule loaves, would I just double the ingredients?
Yes. And do be mindful that larger batches tend to rise a bit faster. You will separate the dough when you remove it from the container for the pre-shaping. So divide the dough and then pre-shape.
Why the different measurement amounts for the next day loaf?
Hi Tammy,
The next day loaf has to have a much smaller amount of sourdough starter to prevent the loaf from overproofing with the longer rise time. And less starter means more flour and more water.
Hi! I just tried this recipe and it was delicious! I loved how I was able to bake and eat the same day! I am wondering if this recipe would work with other grains like spelt, einkorn or emmer? Or would the flour and water ratios need adjusted? Let me know if you have tried this with any other grains other than wheat!
Hi Christina,
I haven’t tried this recipe with different grains but if I were to, I wouldn’t do more than 25% of the other grains.
I made your 4 hr. loaf for the first time, and it was delicious!! I have found that it was a bit too wet to really form, (but it was fire in a loaf pan!) I’m wondering if my humid climate might be to blame? Would you recommend lowering water measurement? Increasing flour? If so, by how much? I would love to bake this as a boule, but it just relaxed into too much of a puddle. Thanks in advance for any suggestions!
Hello!
I would recommend reducing the water. Hold back 40g of water. If the dough looks too dry while kneading, you can always add some back in gradually. I hope this helps!
Hi Amanda,
If your loaf is coming out flat, it may be due to over-roofing. Shorten the bulk fermentation time and see how that works. Garlic can kill the natural yeast in sourdough, so make sure it’s cooked well before adding it in. Also, I would try laminating it in before the final shaping so it doesn’t inhibit bulk fermentation. I hope this helps!